Microsoft Visual Studio and the Rational Team Concert ClearCase Bridge

One part of DevOps that gets less attention is the first 3 letters of the buzzword – DEV. Let’s be real – part of achieving continuous flow very often involves some changes or tweaks to the development side of the equation. A lot of software delivery friction can be caused by the simple fact that development is handing off something that is difficult to deliver. Remember both Dev and Ops have to concur on what the pieces look like – otherwise you end up with a ‘throwing over the wall’ scenario no matter how many times you say “Continuous” or “DevOps”. To that end, we sometimes get involved deeply with development tools of one for one reason or another and kick over some interesting rocks in the process. We recently ran into a very tricky / time consuming problem at a customer that was due to some relatively obscure and undocumented configuration files in the ClearCase product. Given how hairy it was to figure out, we thought we would share with the community. The tee-up:

  • The customer is trying to modernize tooling and has a large amount of code in Rational ClearCase.
  • They have largely moved their Work Items into Rational Team Concert and are looking at more Agile Development processes.
  • The move to RTC Work Items and planning is much easier / faster than moving the code from ClearCase, so they want to use the ClearCase Bridge feature in the interim.
  • Most of their code is C/C++/C# and generally Windows-technology related and they are heavy Microsoft Visual Studio users.
The piece parts:
  • Windows 7 Professional OS (32bit)
  • ClearCase Client 8.0.1 – Fixpack 2
  • RTC Client 4.0.3 (based on Eclipse 4.2)
  • ClearTeam Extension 8.0.1 – Fixpack 2
  • Microsoft Visual Studio 2010 SP1

 The problem: While the installation and configuration of the ClearCase Bridge was very straightforward and worked pretty much first time from the Eclipse client, the Visual Studio integration simply did not. The visible symptom was that it would appear to hang while trying to launch the integrated dialog boxes. After a couple of reconfiguration and re-installation cycles – complete with the ‘fresh machine’ repeat of everything, we were stuck and could not find or get any information about the cause – the configuration was fine according to support. First clues: After some digging around, we discovered that there were some Java core dumps under the TeamConcert directory. Reading those, it was readily apparent that we simply had a JVM heap size problem. No sweat, right? So, since we were dealing with the shell sharing of the RTC client and the ClearTeam Explorer and did not know which configuration would be used when being launched from MS Visual Studio, we went off and modified the eclipse.ini file under TeamConcert and the ctexplorer.ini under CTE. NEITHER FILE HAD ANY EFFECT. And no one could tell us or find a reference that said where the launch command was or how it was configured when it was initiated from the Visual Studio IDE. The big magic secret: As you may have guessed, it turns out there is a third file that governs the launch. We found this through a big pile of tedious investigation. The file is buried in the ClearCase installation directory at a default location of: C:\Program Files\IBM\RationalSDLC\ClearCase\RemoteClient\WANPackage\ccvsrtcintegration.ini There are 2 problems with this file:

  1. It is obscure – if you Google for it, you will not find it.
  2. It uses a JVM call that has limits on its heap size when launching Eclipse. There are a number of technotes about this style of launch, but the one that tipped us off was this one:  http://www-01.ibm.com/support/docview.wss?uid=swg1PM52774

The fix: We modified this file to use the JAVAW style launch in the ccvsrtcintegration.ini file. Our ‘finally fixed it’ example is here, though we have tweaked the heap sizes a bit for our environment.

-vm
C:\Program
Files\IBM\RationalSDLC\common\JAVA5.0\jre\bin\javaw.exe
--launcher.appendVmargs(Executable)
-vmargs
-Xms256m
-Xmx512m
-Xmnx128m
-Xgcpolicy:gencon
-Xscmx96m

Update – 5/9/2014  

The above .INI file has been edited to include the following line:

 --launcher.appendVmargs(Executable)  

This was done to reflect some operational experience with the tool. We discovered that the tuning parameters were not really being respected as one would expect. So, after some investigation and discussion with IBM, we added the line as a way to force it to ignore the command line’s attempt to override the .ini file. Technically the parameter causes the INI files to be appended to the command line no matter what, so the command line that eventually launches the tool is forced to have the tuning parameters. This tweak has so delivered a much more stable end-user experience.

The summary: So, if you are using the CCBridge with Visual Studio and your attempts to launch the association dialogs appear to ‘hang’:

  1. Check for Java core dumps under TeamConcert
  2. If you find a heap size or ‘out of memory’ problem in them, look at the ccvsrtcintegration.ini file and modify it to use the javaw.exe launch rather than the DLL.
  3. Modify your heap sizes as necessary to fine-tune.
Tagged with:
Posted in HowTo

Building a Real IBM UrbanCode Deploy Plugin – Part 4: Completed Plugin

When you put the pieces together, you end up with a useable (and hopefully useful) plugin for your IBM UrbanCode Deploy server.  The video below is a walk-through of the example we have been discussing in the previous 3 parts of this series.

Tagged with: , , , , , , , , ,
Posted in DevOps, HowTo, UrbanCode Deploy

Building a Real IBM UrbanCode Deploy Plugin – Part 3: Groovy

After we have set up the XML files, the next step is the Groovy scripts that will drive the activity. The XML files specify the parameters that will be sent to the Groovy script, how the script will be launched, and even how the return values from the script will be handled. So the scripts job then becomes about grabbing the parameters, doing its job, and then terminating in a predictable way.

For this cut of our Liquibase project, the scripts are effectively command line wrappers. So their job is relatively simple – reliably launch Liquibase via its command line and return the results. For a first cut, we can exploit the fact that the Liquibase command line consistently takes certain parameters and use a common script as a basis for all the commands we want to control and just tweak each as needed for the individual commands. There is ample room for refactoring, but this pattern works pretty well and is quick to implement for our example.

The target command line we are working with in this example step is to use Liquibase to automatically generate some documentation for our database.  In this case the database in question is the one included with the ‘JPetStore’ sample application that comes with IBM UrbanCode Deploy.  If we were going to run the command in a shell, the command would look like it appears below.  We want to duplicate this command with our Groovy script.

/opt/liquibase/liquibase --driver=com.mysql.jdbc.Driver --classpath=/opt/mysql-connector-java-5.0.8-bin.jar --url=jdbc:mysql://localhost:3306/jpetstore --username=exampleuser --password=**** --changeLogFile=/opt/dbinfo/jpetstore_base.xml dbDoc /opt/dbinfo/jpetstore

The first bit of the code is just to get the input properties that are passed in from the agent when the script is fired.

def workDir = new File('.').canonicalFile
final def props = new Properties()
final def inputPropsFile = new File(args[0])
try {
 inputPropsStream = new FileInputStream(inputPropsFile)
 props.load(inputPropsStream)
}
catch (IOException e) {
 throw new RuntimeException(e)
}

We then pull the properties out into individual variables. This list maps 1:1 with the <property> elements we created in plugin.xml.

def command = props['command']
def driver = props['driver']
def driverClasspath = props['driverClasspath']
def jdbcURL = props['jdbcURL']
def username = props['username']
def password = props['password']
def changeLogFile = props['changeLogFile']
def docOutDir = props['docOutDir']

Then, we do simple string manipulation to build the command string that will be passed to the shell.

def lqcmd = command + " " 
lqcmd = lqcmd + "--driver=" + driver + " " 
lqcmd = lqcmd + "--classpath=" + driverClasspath + " " 
lqcmd = lqcmd + " --url=" + jdbcURL + " " 
lqcmd = lqcmd + "--username=" + username + " " 
lqcmd = lqcmd + "--password=" + password + " " 
lqcmd = lqcmd + "--changeLogFile=" + changeLogFile + " "
lqcmd = lqcmd + "dbDoc " 
lqcmd = lqcmd + docOutDir

Finally, we execute the command in the shell and wait for the command to complete. All this basic example checks for is a non-zero exit value otherwise it reports success. This could, of course, be made more robust if needed.

def proc = lqcmd.execute()
proc.waitForProcessOutput(System.out, System.out)
proc.waitFor()

if (proc.exitValue() != 0) {
 System.exit proc.exitValue()
}

This pattern is then repeated in the other .groovy files referenced by plugin.xml with variances in the properties mapping (some have more or less parameters than this one) and from that the command line construction. Remember to be sure that the name of the file matches what is in your plugin.xml file exactly. Put the XML files and Groovy scripts all together into a ZIP file like we saw in Part 1 and import that ZIP into your IBM UrbanCode Deploy server.  At that point it should show up in your process designer tool in UrbanCode Deploy and you or your teams are ready to control a Liquibase installation using the graphical process design and automation capabilities of the tool.

Tagged with: , , , , , , , , ,
Posted in DevOps, HowTo, UrbanCode Deploy

Building a Real IBM UrbanCode Deploy Plugin – Part 2: XML File structure

IBM UrbanCode Deploy plugins are controlled by parameters in a series of XML files.

  • info.xml – This file is primarily metadata about the plugin
  • plugin.xml – This file is the brains of the operation. It is the interface specification that maps step actions and input parameters to the plugin code that does the work. In other words, this controls what the user sees when creating a process and then takes the provide information and tells the agent which script to fire and with which parameters.
  • upgrade.xml – This file defines how the UrbanCode server deals with new versions of the plugin. While it is somewhat minimized in the documentation, it is more useful and more important for keeping plugin upgrades from breaking previously created artifacts in the system. Given some of my experiences, this is probably worth a post by itself.

For info.xml, here are the key elements.

info.xml

The plugin.xml file is more involved.  Inside the overall <plugin> element are a series of repeated <step-type> elements – each of these represents one ‘block’ that can be dropped onto the process designer and how that block will behave when used.

plugin.xml

Finally, there is upgrade.xml.  This file handles the behavior when new versions of the plugin are imported into an IBM UrbanCode Deploy server. As mentioned above, there is subtlety here that is worthy of its own discussion. As a practical matter, you do not need to use upgrade.xml as long as you do not change anything in the <step-type> blocks that existed in the older version. Adding new <step-types> is OK as well. However, any change to a pre-existing <step-type> element or sub-element requires use of upgrade.xml or it will cause breakage or other problems. Also, do not delete an older version and replace with a new plugin. That can invalidate your process definitions as they track the version of the plugin present and cause you to have to re-create your process definitions.

upgrade.xml

There is plenty of grist for the blog mill in these XML files. The documentation is pretty good and it is also helpful to look at examples in the plugins provided with the product.  Once these are defined, it is time to move on to the Groovy script part of the plugin discussion.

PS – apologies on the PDF-based code snips. We are on the free wordpress and have not solved the code formatting display problem yet.

Tagged with: , , , , , , , , , , ,
Posted in DevOps, HowTo, UrbanCode Deploy

Building a Real IBM UrbanCode Plugin – Part 1: Background and Setup

Several blogs, including ours, have shared some introductory posts on how to structure an UrbanCode plugin. I decided to take these a step forward and actually build one for a reasonably well-known tool. I chose Liquibase as my guinea pig for several reasons. First, because it was outside the typical code mover scenarios – I am extremely passionate about moving the DevOps discussion forward from the too-typical “app and OS” issues. Second, I happen to know several of the people involved with Liquibase here in Austin. And Third, I felt Liquibase would be a good example of a good toolchain citizen as I have begun discussing on my personal blog.

I am not going to get deep into the use of Liquibase. That is well documented and, while the issues Liquibase addresses are only now getting the attention they deserve, the tool itself has been around for a while and is pretty well understood by folks who have been out in front of things a bit. So, my goals with this were to provide basic automation of core database tasks. I want to be able to bring the database under management, generate documentation for the database, and then perform update / rollback tasks on the database.

Translating that into Liquibase commands, that equates to:

  • generateChangeLog
  • changelogSync
  • dbDoc
  • updateTestingRollback
  • update
  • rollbackCount

Given that set of goals, the first step is to lay out the project. In the interests of keeping the effort simple, I decided to do at least this first version of the plugin as a simple command line wrapper. That way I get value quickly while still gaining the benefits of process integration and abstracting my users from lengthy command lines with many arguments. My plugin project therefore ended up needing the 3 XML files (info.xml, plugin.xml, and upgrade.xml) and 6 Groovy scripts – one for each of the Liquibase commands I wanted to capture in this first effort. These 9 files all went into a single directory and eventually a single ZIP file.

Liquibase_PluginFileStructure

In the next couple of posts, I’ll flesh out the contents of these files.

Tagged with: , , , , , , , , , , ,
Posted in DevOps, HowTo, UrbanCode Deploy

UrbanCode Java API

I started working with the UrbanCode Rest API after reading a blog post by Lara Ziosi. In her post she walks you through getting started with Apache Wink and has a small code snippet printing out a list of components and their versions. Her work inspired me to start breaking the REST API into simpler Java methods. I currently have two classes: ApplicationManager and ComponentManager.

The ApplicationManager has the following methods:

  • createApplication
  • setApplicationName
  • setApplicationDescription
  • getApplicationList
  • getApplicationName
  • getApplicationId
  • getApplicationByName
  • getApplicationById

The ComponentManager has the following methods:

  • createComponent
  • setComponentName
  • setComponentDescription
  • getComponentId
  • getComponentName
  • getComponentByName
  • getComponentById
  • getComponentList
  • getComponentVersions

The ApplicationManager and ComponentManager are early stage classes that are limited to creating, editing, and reading. I am working on other functionality such as adding/removing components to applications and editing processes. The links above point to a PDF file.

Tagged with: , , , , , , , , ,
Posted in DevOps

Using Amazon EC2 instances with UrbanCode Deploy

The power of Infrastructure as a Service technology is one of the fertilizers helping the DevOps movement bloom.  Since the creation and configuration of infrastructure can be codified, the imperative to version everything ensures that all deploys are consist across environments from the (virtual) hardware level up, and the actions taken with each version are recorded.  While this configuration history is useful, we gain a much more tangible value with powerful automation tools; a deployment orchestrator like IBM Rational UrbanCode Deploy can turn the collected processes into a one (or zero) click operation.  By making use of the scripts and tools already in your repertoire with its own powerful object definition and versioning capabilities (and plugins for everything under the sun), a team essentially creates their own platform service, customized for the potentially complex reality of their unique software project.

In UrbanCode Deploy’s management schema, an Application’s definition lists every single Component it would contain.  These components have their own processes for starting, stopping, and managing themselves, so the application’s processes can invoke these component processes to have an environment bootstrap itself.  For this example, we are going to work with the AWS EC2 system, the ever-familiar and accessible cloud system from Amazon, by creating a component to represent an EC2 instance with a startup process.  A plugin exists for UrbanCode Deploy that gives us the ability to work with EC2 machines, and by setting up our processes right we can manage the component effectively within the application lifecycles.

An EC2 image is initialized by referencing the ID code of an Amazon Machine Image (AMI) from either the many publically available offerings or an image created by the user.  The startup and shutdown processes are going to be similar for any EC2 image, so we have created a Component Template with these processes defined; proper use of environment and component properties gives this the flexibility to be applied to any machine configuration we want.

EC2 article 1 (1)

An Amazon EC2 component has a couple files that every implementation will need: an AWS SDK jar file asked for by any EC2 step and a private key file to match one of your keys set up in the AWS account.  Our example is using a simple file system to hold these, but you may wish to connect this to one of your existing repositories.  The properties section defines Component Template properties that are statically accessible to all children; we have used it to define the AWS jar file’s name.

EC2 article 1 (2)

The Component Property Definitions section creates properties that are defined by the children.  You may set default values here if desired, as we did with the access keys.

EC2 article 1 (3)

Lastly, we will create some Environment Properties.  When a component is added to an environment, the environment properties defined by a component flow upwards, so that information needed by other components can be accessed.  The name of the UDC Agent that will be created by this component and the host name of the virtual machine would be useful information, so we will define them here and populate them during our startup process.

Your organization may have a specific image used as a baseline; we will be using a Red Hat Enterprise Linux image.  Our startup process first downloads the private key and jar file artifacts into a working directory on an existing UCD Agent.  The AmazonEC2 steps are found under the Cloud folder after the plugin is installed, so we can drag and drop those steps into our process.

EC2 article 1 (4)

The Launch_Instance step is where the heavy lifting is done.  EC2 provides Access Keys and Secret Keys, hash values that are used to give API permissions for tools to interact with it.  The AMI ID is a constant identifier for specific images in the AWS repository.  The keypair specifies the name of a keypair that is part of your AWS account, associated with the private key we downloaded in the first step (a versioned part of this component).  These are set to component properties (we’ll define those in a minute) so that all components that inherit this template can define their values for their implementation.  This configuration does not define a fluid instance count or type, or specify a security group and availability zone, but those can be just as easily given variables or values based on your needs.  We are going to use an AMI that is listed in the default zone (Amazon’s Eastern Seaboard), but if you are using an AMI that exists in a different Availability Zone, be sure to specify it or the process will fail.

EC2 article 1 (5)

This step registers as complete when the image is finished initializing.  The next steps will store the instance ID of the new virtual server, as well as the public DNS.  Often little is documented in terms of what properties certain steps create (particularly with plugins), and one might assume that a Post Process Script must be created to jump through hoops and get information from the output log.  Fortunately, there is a far simpler solution: the Component Request History lists every attempted process execution, and contains both a log of every step and a list of step Properties.  This is how we learned that our EC2 Initialization step “Launch_Instance” creates a step property called “instances” that contains an array of all instance IDs started, and a “dns” property that holds the public IP.  Thus, the last two steps in the process store that information in Component Environment Properties with the “Set Component Environment Property” function.

EC2 article 1 (7) EC2 article 1 (6)

By referring to the environment and components by their id properties, this process remains loosely coupled.  The environment properties will be accessible to everything in an environment that contains these components- we will need these to shut down or work with the machines.

Now that the template is done, we can make a component to represent our specific server.  This is the configuration page for our component; note that it has fields for all the definitions in the template.  The property definitions we have created already will work in their default states.

EC2 article 1 (8)

We can now add this component to an application and assign it to a resource within an environment.  The variables used in this example were for a Linux machine, so we have an agent on a RHEL server to perform the first steps.

EC2 article 1 (9)

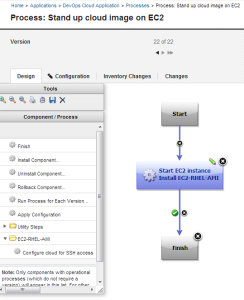
Our application process for setting up our cloud environment will look extremely simple right now.  We need only invoke the EC2-RHEL-AMI component’s startup process.

EC2 article 1 (10)

And now for the fun part!  Pick an environment and give the whole thing a go!

EC2 article 1 (11)

When we start this Application process, it has the component do the steps defined above, resulting in an online image on the Amazon cloud and a few environment variables for future use.  The component is listed in the inventory, so we know where these images are while they are alive (they will be removed with a shutdown process).

EC2 article 1 (12)

We can click into the Application Process Execution and get to the component deploy page from there to look at logs and input/output data.  A Properties tab shows all the step properties; this is the page to check after a test run to see if any variables you need are being created by a plugin step without explicitly telling you.

EC2 article 1 (13)

If we look at our AWS control panel, we can see that the instance we requested is indeed up and running.

EC2 article 1 (14)

This is only a simplistic initial process.  By referencing the environment variables  we set earlier, we can use the server as much as needed, and create a process like this one to take it offline:

EC2 article 1 (15)

By getting creative with properties and creating more complex workflows, you can utilize the power of the Amazon cloud with versioning, automation, and a paper trail, and have it directly integrated with all of your other deploy processes.

Tagged with: , , , , , , , ,
Posted in DevOps, HowTo, UrbanCode Deploy

Exploring the IBM UrbanCode Deploy 6.0.1 Plugin Changes

Plugins are a major piece of the value of the IBM UrbanCode Deploy tool.  They provide a simple way to automate adjacent pieces of the application’s environment in a way that allows you to move users away from direct access to deployment target environments. IBM UrbanCode  Deploy are pretty modular, easy to manage, easy to create, and provide a great way for either the product team or customers to extend the value of the tool. However, as the number of plugins grows, it becomes that much more important to track what is going on with them so that you can identify new integration opportunities and track potential improvements to ones you are already using.

With the advent of the 6.0.1 release, a number of plugins have been added and a number have changed.  Unfortunately, I have yet to see a comprehensive list of what plugins have been added or changed, so I did a little digging and compared the plugins that shipped with 6.0 and those that shipped with 6.0.1.  This initial pass is just a cursory look to see what’s there.

My approach was to do a binary comparison between all of the files even if they had the same name.  That enabled me to verify that the contents had not changed between releases.  It also enabled me to identify files, such as the Remedy plugin, that changed names between releases, but were unchanged at the content level.

If people are interested, I will dig into the next layer of seeing which of the updated plugins have substantive additions, such as new methods or properties, and which appear to just have fixes without obvious operational changes. Please consider this a standing invitation to add your findings in the comments.

Downloadable list: I created a handy PDF if you want to download the summary in a more consumable form.   Available here if you are interested:  IBM_UCD_60_to_601_plugin_comparison

In the meantime, I hope this list will help those upgrading to know what they need to look at and what they can ignore.

New (did not exist in 6.0 but do in 6.0.1)

  • AgentPropertiesCollector-2.455141.zip
  • AnthillSourceConfig-1.455112.zip
  • ClearCaseSourceConfig-1.455167.zip
  • FileSystemSourceConfig-1.455169.zip
  • FileSystemVersionedSourceConfig-1.455159.zip
  • GitSourceConfig-1.455161.zip
  • ibm-ucdeploy-publisher.hpi
  • MavenSourceConfig-1.455170.zip
  • plugin-air-RTC-WorkItems-2.455564.zip
  • RAMSourceConfig-1.455163.zip
  • SubversionSourceConfig-1.455152.zip
  • TFS-SourceConfig-1.455154.zip
  • TFS_SCM-SourceConfig-1.455162.zip
  • uBuildSourceConfig-1.455076.zip
  • web-utilities-1.446294.zip
  • WebSpherePortal-1.452361.zip
  • WindowsFailoverCluster-3.455119.zip

Updated (Changed between 6.0 and 6.0.1)

  • ApplicationDeploymentForWebSphere-68.455164.zip
  • Chef-1.455055.zip
  • FileUtils-31.455052.zip
  • GreenHat-1.455099.zip
  • ibm-ucd-agent-script-package.zip
  • JBoss-6.455062.zip
  • JUnit-1.455144.zip
  • Maven-2.455085.zip
  • MCWASPlugin-3.131121.zip
  • RPM-2.432456.zip
  • RQM-2.455153.zip
  • ServiceNow-8.450859.zip
  • Shell-3.455056.zip
  • SQLCmd-4.455081.zip
  • SQLPlus-6.455179.zip
  • SystemInformation-2.455048.zip
  • Tomcat-4.455075.zip
  • uBuild-4.455175.zip
  • uDeploy-Application-63.455151.zip
  • uDeploy-Component-61.455109.zip
  • uDeploy-Environment-64.455050.zip
  • uDeploy-Resource-64.455077.zip
  • uDeploy-System-61.453415.zip
  • uDeploy-Version-60.455054.zip
  • uDeployConfigManagement-3.455073.zip
  • UrbancodeVFS-18.455070.zip
  • Urbancode_Package_Manager-3.455115.zip
  • WebSphere Liberty-2.455142.zip
  • WindowsSystemTools-13.455110.zip

Removed (Were in 6.0 but not in 6.0.1)

  • Example.zip
  • WebSphereMessageBroker.zip

Unchanged (Showed no difference between 6.0 and 6.0.1 package)

  • Remedy-1.423633.zip   (*renamed, but unchanged)
  • air-worklight-1.423586.zip
  • AmazonEC2-4.423632.zip
  • Ant-2.423681.zip
  • Anthill-7.424532.zip
  • Apache-1.423580.zip
  • DBUpgrader-1.423703.zip
  • DeployTools-5.423702.zip
  • F5-8.423587.zip
  • Groovy-2.423689.zip
  • IIS-AdminScripts-7.424216.zip
  • IIS-AppCmd-2.423623.zip
  • IIS-MSDeploy-1.423639.zip
  • JIRA-3.423640.zip
  • LinuxSystemTools-8.423698.zip
  • Rally-1.0.0_b423612.zip
  • Selenium-3.423652.zip
  • ServiceControlManager-8.423610.zip
  • Sharepoint-4.423644.zip
  • SQL-JDBC-4.423630.zip
  • Subversion-export-2.423664.zip
  • WebSphereMQ-1.423574.zip
  • WebSphereMessageBroker-CMP-6.424588 (1).zip  (*renamed, but unchanged)


Tagged with: , , , , , , ,
Posted in DevOps, UrbanCode Deploy

IBM UrbanCode Products updated to 6.0.1

The 6.0.1 versions of IBM UrbanCode Deploy and IBM UrbanCode Release are available.   As the UC suite is still new within IBM’s portfolio and being brought into line with the rest of the products, these are more substantial “.0.1” releases than the version number increment implies.   Handily, Eric Minick has put a number of posts on the UrbanCode blog site tagged with “v6-0-1” that cover the improvements to both products nicely.

Clicking this URL will give you all the posts with that tag:  http://blogs.urbancode.com/tag/v6-0-1/

Tagged with: , , , ,
Posted in DevOps, Uncategorized, UrbanCode Deploy

IBM UrbanCode Deploy LDAP Howto

Integrating tools with LDAP all to frequently turns into a lengthy endeavor marked by misunderstanding and misinformation around something that should be a fundamentally simple exercise.   Some of this is due to common misunderstandings of how LDAP is set up in a particular environment and some is due to the varied ways in which tools consume data from LDAP directories.  This video focuses on the new IBM version of UrbanCode’s uDeploy tool – now called IBM UrbanCode Deploy- and how to connect it to an LDAP directory.  While not an LDAP tutorial, I tried to add some helpful tips / tricks that will may help someone with only a basic understanding of LDAP accomplish the integration without requiring the services of an LDAP guru.

Tagged with: , , , , , , , , ,
Posted in DevOps, HowTo, UrbanCode Deploy
DevOps

Avnet Services DevOps Team Blog

Crossing Silos

DevOps only works if you cross boundaries

Avnet Services DevOps

Avnet Services DevOps Team Blog